Getting your inline density meter installation right the first time is the single biggest factor separating plants that enjoy years of stable, accurate readings from those that spend months chasing drift, entrained air errors, and sensor failures. Whether you are commissioning a brand-new LONNMETER inline density meter on a chemical reactor loop or retro-fitting an online density meter into a legacy sugar clarification line, the principles are the same: correct location, proper mechanical support, disciplined electrical practice, and a methodical commissioning sequence.
This guide walks you through every stage — from pre-installation planning through to live DCS integration and ongoing verification. It is written for the engineers and technicians who actually do the work, not just those who approve the purchase order. Follow it in sequence, and your LONNMETER inline density meter will deliver the ±0.0001 g/cm³ repeatability it was designed for.
1. Introduction
The inline density meter installation process is where great instrumentation goes wrong — not because the sensor is defective, but because the surrounding system was not prepared to receive it. Pipe reducers placed too close to the measurement neck, upstream control valves that generate cavitation shockwaves, cable runs through variable-frequency drive (VFD) noise zones, or commissioning teams that energise the sensor before verifying grounding integrity — each of these is an avoidable mistake that manifests as measurement drift, signal instability, or outright sensor failure within months of startup.
An inline density meter is not a probe you drop into a tank. It is an integral part of your process piping. Its measurement performance is as dependent on the installation geometry as on the sensor itself. LONNMETER designs its inline density meters — the DENSITY-SERIES online density meters — to tolerate a wide range of process conditions, but they reach peak accuracy and longevity only when installed according to established best practices.
This article is the companion installation guide to our Inline Density Measurement Fundamentals (B-01) and our Density Meter Selection Guide (B-03). If you have not yet selected your meter, read B-03 first — the mounting configuration you choose will dictate much of what follows here.
By the end of this guide you will know exactly how to select your installation location, size and prepare your piping, wire the instrument correctly for your hazardous area classification, commission the sensor, and integrate it with your control system. Let’s get into it.
Inline density meter installation: 2. Understanding the Installation Requirements
Before selecting a location or opening a single box, you need to understand what an inline density meter actually measures and what environmental conditions it requires to do so accurately.
2.1 What the Sensor Measures
LONNMETER inline density meters use a vibrating fork (oscillating U-tube) principle. A pair of flexurally resonant forks are excited at their natural frequency, which changes in proportion to the density of the fluid surrounding them. The relationship is governed by the equation:
f² ∝ √(ρ × E / I)
Where f is the resonant frequency, ρ is fluid density, E is the fork material’s Young’s modulus, and I is the second moment of area. Because E and I are constants for a given sensor, the resonant frequency directly encodes fluid density.
This means the sensor measures true mass per unit volume — not a inferential or correlated value. But it also means the sensor is sensitive to any force that modifies the effective mass of the vibrating element. The two most common sources of interference are:
- Process flow forces — dynamic pressure from high-velocity fluid impact on the fork
- Vibration transmission — mechanical vibration from nearby pumps, agitators, or compressors
Understanding these sensitivities informs every decision in the installation design.
2.2 Environmental Conditions
An inline density meter installation must satisfy four categories of requirement:
| Requirement Category | Key Parameters | LONNMETER Standard Range |
|---|---|---|
| Process medium | Compatible fluid chemistry | Corrosion-resistant 316L / Hastelloy C-22 wetted parts |
| Temperature | Process fluid temperature | −40 °C to +180 °C (extended to +250 °C with cooling collar) |
| Pressure | Working pressure at sensor | Up to PN40 / Class 300 (4.0 MPa / 580 psi) |
| Atmosphere | Hazardous area classification | ATEX Zone 1/2, IECEx certified |
The installation location must allow the sensor to operate within these ranges at all times, including during process upsets, cleaning-in-place (CIP) cycles, and emergency shutdowns.
2.3 Accessibility Requirements
Your density meter mounting point must satisfy practical access requirements:
- Minimum 600 mm (24 in) clearance on all sides for maintenance access
- A safe working platform or ladder if the installation height exceeds 1.8 m (6 ft)
- No direct overhead load paths — do not install directly beneath pipe racks or vibrating equipment
- Adequate lighting for instrument reading and commissioning work
If the installation site cannot meet these minimums, the meter will be neglected in service. Plan for maintenance from day one.
Inline density meter installation: 3. Pre-Installation Checklist
Thorough preparation prevents poor performance. Complete every item on this checklist before your LONNMETER inline density meter arrives on site.
3.1 Documentation and Compliance
- Confirm purchase order matches the process data sheet (medium, temperature, pressure, density range)
- Obtain LONNMETER datasheet and installation drawing (shipped with instrument, also available at/products/density-meter)
- Confirm hazardous area certification matches the installation zone (ATEX Zone 1/2 or IECEx certified — verify the label on the sensor housing)
- Review ATEX/IECEx documentation: entity parameters, max safe voltage (U i), max safe current (I i), max safe power (P i)
- Confirm all permits-to-work are issued for hot-work and electrical work in the designated area
- Notify DCS / control system engineer that the instrument will be wired during the shutdown window
3.2 Tools and Equipment
Assemble these before the installation window:
| Tool / Equipment | Purpose |
|---|---|
| Torque wrench (Nm range) | Flange bolting to specified torque values |
| Socket set (metric and imperial) | Flange and cable gland installation |
| Insulation resistance tester (500 V DC) | Cable and grounding integrity verification |
| Multimeter (4-20 mA loop tester) | Signal loop commissioning |
| Process calibrator / HART communicator | Sensor calibration verification |
| LONNMETER DENSITY-SERIES configuration software | Parameter setup and diagnostics |
| Personal Protective Equipment | Hard hat, safety glasses, arc-flash gloves, flame-resistant clothing |
| Gasket sets (spare) | Recommended — always have spares on hand |
| Cable gland kit (ATEX-rated) | Factory-specified gland for hazardous areas |
| Grounding braid and clamp | Equipotential bonding of sensor housing |
3.3 Piping Location Selection
The location selection is the single most consequential decision in the installation. Evaluate your candidate locations against these criteria:
Flow orientation: LONNMETER inline density meters can be installed in horizontal or vertical pipe runs. Vertical upward flow is preferred for liquid applications because it helps purge any entrained gas bubbles from the measurement chamber. If upward vertical flow is not possible, horizontal installation with the sensor forks in the lower half of the pipe cross-section minimises gas accumulation.
Straight run requirements (critical): This is non-negotiable. The vibrating fork sensor requires fully developed, laminar pipe flow to achieve its rated accuracy. You must provide:
- Minimum 5× pipe diameter (5D) straight run upstream of the density meter
- Minimum 3× pipe diameter (3D) straight run downstream of the density meter
For a DN50 (2-inch) line, that means at least 250 mm upstream and 150 mm downstream of unobstructed pipe. For DN100 (4-inch), it is 500 mm upstream and 300 mm downstream. No reducers, elbows, tees, pumps, control valves, or flow disturbances within these zones.
Upstream disturbance types to avoid within 5D:
- Orifice plates and flow nozzles
- Partially open valves (especially globe and butterfly valves)
- Pipe bends in any plane
- Pump or compressor discharge outlets
- Any components that generate asymmetric velocity profiles
Bypass loop configuration: In many process applications, it is preferable to install the inline density meter on a bypass loop rather than directly in the main process line. This approach offers three advantages:
- The main process flow does not need to be interrupted for sensor removal or maintenance
- Flow velocity through the sensor can be independently controlled via a bypass valve
- Commissioning and calibration can be performed without disrupting the main process
Bypass loop design is detailed in Section 5.
3.4 Flange Selection
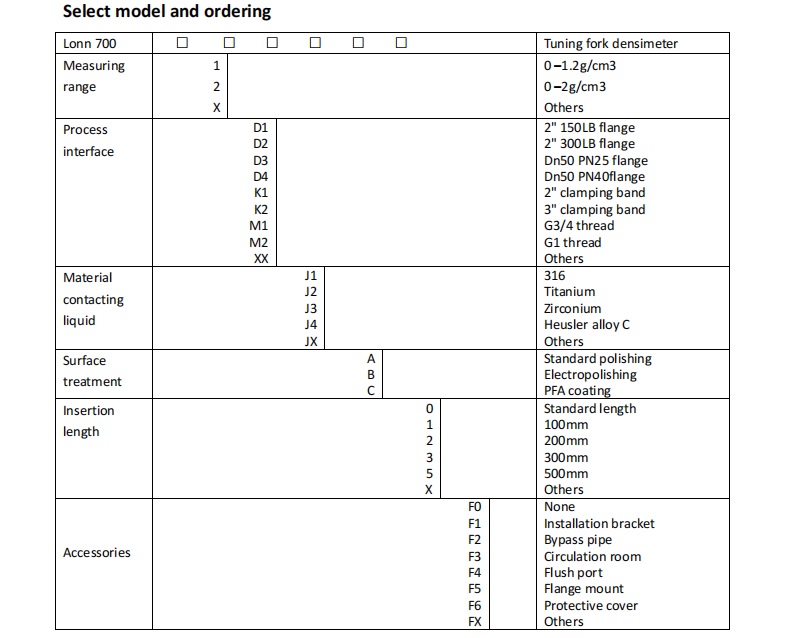
LONNMETER inline density meters ship with configurable flanges to match your process piping. The standard range covers:
| Flange Size | Pressure Rating | Face-to-Face (FTF) Dimension |
|---|---|---|
| DN25 / 1″ | PN16–PN40 | 200 mm |
| DN40 / 1½″ | PN16–PN40 | 200 mm |
| DN50 / 2″ | PN16–PN40 | 200 mm |
| DN80 / 3″ | PN16–PN40 | 250 mm |
| DN100 / 4″ | PN16–PN40 | 300 mm |
Match the flange pressure rating to your process pressure. The sensor housing rated at PN40 (4.0 MPa) must not be installed on a PN16 (1.6 MPa) line, regardless of operating pressure. Always use the higher of operating pressure or design pressure when specifying the flange.
Gasket selection: Use a gasket material compatible with your process medium. Spiral-wound stainless steel with PTFE filler is the standard choice for most chemical applications. For food, dairy, and pharmaceutical applications, use FDA-compliant elastomer gaskets (EPDM, silicone, or PTFE-encapsulated).
Inline density meter installation: 4. Step-by-Step Installation Procedure
Follow this sequence precisely. Each step exists for a reason — do not skip steps even under time pressure.
Step 1: Site Preparation and Isolation
1.1 Confirm the process line is isolated, depressurised, drained, and locked out / tag out (LOTO) in accordance with your site safety procedures.
1.2 Verify zero energy state with a calibrated pressure gauge at the isolation points.
1.3 Confirm the LOTO includes all energy sources: process isolation, instrument air (if pneumatic), and electrical supply.
⚠ Critical Safety Point: Never attempt to install or remove an inline density meter on a pressurised line. The vibrating fork element inside the sensor housing is mechanically fragile. A pressure blow-out can cause serious injury and will void the LONNMETER warranty.
Step 2: Physical Mounting
2.1 Unpack the LONNMETER density meter and inspect for any shipping damage. Check that the tag on the sensor matches your process data sheet.
2.2 Position the meter in the pipeline. For vertical bypass loops, ensure flow direction is upward through the sensor. The flow direction arrow cast on the sensor housing must align with the process flow direction.
2.3 Place new gaskets on each flange face. Never reuse old gaskets — compression set makes them unreliable.
2.4 Insert all flange bolts. Hand-tighten in a star pattern (alternating bolt positions) to draw the flanges evenly together.
2.5 Torque the flange bolts to the specified values:
| Bolt Size | Torque (Nm) — Stainless Steel A4-70 |
|---|---|
| M12 | 45–55 Nm |
| M16 | 110–130 Nm |
| M20 | 210–250 Nm |
| M24 | 360–420 Nm |
Tighten in three stages: 30% of target torque, 60%, then 100%. Use a calibrated torque wrench. Uneven bolt loading distorts the flange and creates a leak path.
2.6 After torquing, perform a soap-bubble leak test at 1.1× design pressure. Hold for 10 minutes with no bubble formation.
Step 3: Equipotential Bonding
3.1 Attach the grounding braid (minimum 4 mm², green/yellow) from the sensor housing to the nearest equipotential bonding busbar using the M6 stainless steel grounding lug provided.
3.2 Tighten to 8 Nm. Coat the connection with a corrosion-inhibiting compound if the environment is corrosive (coastal, chemical, or high-humidity).
3.3 Measure the resistance between the sensor housing and the equipotential busbar: must be < 1 Ω.
Step 4: Cable Gland and Wiring
4.1 Select the ATEX/IECEx-rated cable gland appropriate for your installation (see Section 6 for detailed wiring guidance). The factory-supplied glands are certified for the sensor’s hazardous area rating. Substitution with uncertified glands voids the ATEX certification.
4.2 Route signal cable (twisted-pair shielded, 0.5–1.5 mm²) from the sensor junction box to the control room or marshalling cabinet. Use dedicated cable trays — do not bundle with power cables or VFD wiring.
4.3 Install cable glands with the sealing cone facing the sensor housing. Torque the gland body to 25 Nm.
4.4 Connect conductors to the terminal block in the junction box following the wiring diagram. Verify polarity: +24 V DC supply, 4–20 mA signal + (red), 4–20 mA signal − (blue), RS-485 A/B for Modbus RTU.
4.5 Torque all terminals to 0.4–0.5 Nm. Use a small flat-blade screwdriver. Over-torquing damages spring-loaded terminals.
4.6 Close the junction box and secure with the locking screws (hand-tight plus 1/8 turn with a screwdriver).
5. Pipe Sizing and Flow Considerations
The inline density meter’s vibrating fork sensor responds to density changes in microseconds — but it also responds to dynamic forces from the process flow. Getting the flow conditions right is what separates a sensor that delivers ±0.0001 g/cm³ repeatability from one that drifts ±0.005 g/cm³ and cannot be stabilised.
5.1 Straight Run Requirements — The Non-Negotiable Rule
The straight run requirements stated in Section 3.3 are based on fluid dynamics fundamentals. In pipe flow, disturbances (elbows, valves, reducers) generate asymmetric velocity profiles and secondary flows that persist for many diameters downstream before the flow re-develops into a uniform profile.
A vibrating fork density meter with an active flow measurement algorithm will partially compensate for flow velocity — but this compensation is calibrated for uniform, fully developed flow. If the incoming flow is asymmetric, the effective flow correction applied by the sensor will be incorrect, and the reported density will carry a systematic error.
Design rule: If you cannot provide the full 5D upstream / 3D downstream straight run, you must install a flow straightener (a bundle of thin-wall tubes, minimum 10 diameters long, inside the pipe upstream of the meter). Consult the LONNMETER engineering team before specifying this option, as it adds pressure drop.
5.2 Flow Velocity Limits
LONNMETER inline density meters have a maximum rated flow velocity of 3 m/s (10 ft/s) for liquid applications. Above this velocity, the dynamic pressure on the fork generates a measurable positive bias in the density reading. At 5 m/s, this bias can exceed 0.002 g/cm³ on water — an unacceptable error for most process control applications.
Recommended operating range: 0.3–2.0 m/s for best accuracy. Below 0.3 m/s, the sensor may not have sufficient fluid exchange around the fork to track rapid density changes accurately.
Sizing calculation example: For a DN50 line (inner diameter ≈ 52 mm, cross-sectional area ≈ 0.00212 m²) at 1.5 m/s flow velocity, the volumetric flow rate is:
Q = v × A = 1.5 × 0.00212 ≈ 0.00318 m³/s ≈ 11.4 m³/h
Use this to specify the bypass loop orifice or restriction if you are designing a dedicated bypass.
5.3 Bypass Loop Design
For bypass installations, the key design parameters are:
| Parameter | Recommended Value |
|---|---|
| Bypass line diameter | ½ to ⅔ of main line diameter |
| Bypass flow control valve | Globe-type, manually set |
| Typical bypass flow velocity | 0.5–1.5 m/s |
| Bypass isolation valves | Full-bore ball valves, to allow full flow during cleaning |
| Bypass loop orientation | Vertical upward flow preferred |
The bypass loop should incorporate a sample cooler if the process temperature exceeds the inline density meter’s upper temperature limit or if the temperature fluctuates significantly. Temperature stability of ±0.1 °C is required to achieve the sensor’s stated precision.
5.4 Handling Viscous Media
For highly viscous process fluids (viscosity > 100 mPa·s), the effective straight run requirement increases. Multiply the standard 5D upstream requirement by a factor of (μ / 1)^0.5, where μ is the viscosity in mPa·s relative to water at 1 mPa·s. For a 500 mPa·s fluid, this means approximately 11D upstream straight run. If this cannot be achieved, contact LONNMETER engineering for alternative recommendations.
6. Electrical and Signal Wiring
The wiring installation for an inline density meter is where the most common commissioning failures originate. Pay close attention to this section.
6.1 Power Supply Requirements
LONNMETER DENSITY-SERIES inline density meters operate on 24 V DC nominal (range: 18–32 V DC). At 24 V DC and 4-20 mA signal loop, the maximum loop resistance is 250 Ω (including cable resistance).
Power consumption:
- Standard version: < 3.5 W
- Explosion-proof / ATEX Zone 1 version: < 4.2 W
For ATEX Zone 1 installations, the power supply must be an Ex-isolated power supply rated for the sensor’s Ui, Ii, and Pi parameters. Verify these are recorded on the ATEX label before connecting.
6.2 Signal Outputs
The standard signal configuration is:
| Output | Type | Description |
|---|---|---|
| Primary | 4–20 mA HART | Analog signal proportional to measured density. HART protocol for remote configuration and diagnostics. |
| Secondary | RS-485 / Modbus RTU | Digital communication at 1200–38400 baud. Used for multi-drop networking and advanced diagnostics. |
| Secondary (optional) | Relay alarm outputs | Configurable high/low density alarms, fault alarm. |
4–20 mA loop wiring: Use twisted-pair shielded cable, minimum 0.5 mm² (AWG 20). The shield should be grounded at one end only — at the receiving instrument (DCS/PLC input card), not at the sensor. Floating the shield at both ends creates a ground loop.
6.3 Hazardous Area Wiring — ATEX Zone 1/2 and IECEx
For installations in classified hazardous areas, wiring practice is governed by IEC 60079-14 (Explosive Atmospheres — Electrical Installations). Key requirements:
Cable selection:
- Use armoured or steel-wire-armoured (SWA) cable, or run in heavy-gauge steel conduit
- Cable gland must be ATEX/IECEx certified with the appropriate protection concept (Ex d “flameproof” or Ex e “increased safety”)
- Minimum cable temperature rating: 80 °C above ambient for Tropical / Middle East installations
Barrier and isolator requirements:
- If the sensor is located in Zone 1 and the DCS input card is in the safe area, an intrinsic safety barrier (Zener barrier or isolator) must be installed in the safe area
- Barrier parameters must match or be less than the sensor’s entity parameters (Ui ≥ Vmax, Ii ≥ Imax, Pi ≥ Pmax, Ci ≤ Ci max, Li ≤ Li max)
Specific LONNMETER ATEX / IECEx parameters (verify on your unit’s label):
| Parameter | Typical Value |
|---|---|
| ATEX marking | II 2G Ex d IIC T6 Gb |
| IECEx certification | IECEx EX d IIC T6 Gb |
| Max surface temperature | T6 (85 °C) |
| Ui (max input voltage) | 30 V DC |
| Ii (max input current) | 100 mA |
| Pi (max input power) | 1.0 W |
Wiring segregation: Route instrument cables on dedicated ladder rungs or in separate cable trays from:
- Motor power cables (VFD or DOL)
- High-voltage switchgear wiring
- RF and microwave communication cables
Variable frequency drive (VFD) noise is the leading cause of 4-20 mA signal corruption. Maintain a minimum 300 mm separation from VFD power cables.
6.4 Grounding and Shield Termination
Proper grounding is non-negotiable for measurement accuracy and safety:
- Signal cable shield: Ground at the DCS/PLC end only. Use a shielded cable gland at the sensor junction box to terminate the shield drain wire to the housing ground. Do not leave the shield floating.
- Sensor housing ground: Connect the dedicated ground terminal on the junction box to the plant equipotential bonding system with a green/yellow 4 mm² minimum conductor.
- Pipe flanges: Use grounding straps across the flange gasket on non-conductive lined pipe (e.g., glass-lined, PTFE-lined, or plastic pipe). The pipe flanges must be electrically bonded to prevent static charge accumulation.
- Verify grounding resistance: < 1 Ω between sensor housing and main ground bus.
7. Commissioning and Startup
Commissioning is where you verify that the mechanical installation and electrical wiring have been executed correctly, and that the sensor is responding to the process medium as expected. Follow this sequence without shortcuts.
7.1 Pre-Energisation Checks
Before applying power, verify each of the following:
| Check | Method | Pass Criterion |
|---|---|---|
| Mechanical integrity | Visual and torque verification | All bolts torqued, no visible gaps |
| Gasket integrity | Soap-bubble test at 1.1× design pressure | No bubble formation in 10 min |
| Grounding resistance | Earth resistance tester | < 1 Ω |
| Cable insulation resistance | 500 V DC insulation tester between conductors and shield | > 20 MΩ |
| Power supply voltage | Multimeter at sensor terminals | 18–32 V DC |
| Hazardous area certification | Visual check of ATEX label vs. installation zone | Certificate matches or exceeds zone rating |
| Flange orientation | Flow arrow vs. process flow direction | Arrow aligned with flow |
7.2 Energisation and Basic Verification
7.2.1 Apply 24 V DC power to the sensor. Observe the indicator LEDs on the electronics module:
- Green LED steady: Normal operation
- Amber LED flashing: Warning — check configuration or process alarm condition
- Red LED steady: Fault — check wiring and supply voltage
7.2.2 Allow a 30-minute warm-up period for the electronics to stabilise. This is especially important in cold environments (process temperature < 10 °C) where electronics drift can be significant.
7.2.3 Connect a HART communicator or the LONNMETER DENSITY-SERIES configuration software. Verify the sensor tag, model number, firmware version, and measurement units match your data sheet.
7.3 Configuration Verification
7.3.1 Verify the density range (minimum and maximum density values) is set correctly for your process. The default range is 0–3 g/cm³, but for specific gravity measurement of a process fluid near 1.0 g/cm³, a narrower range improves resolution.
7.3.2 Verify the output mode: 4–20 mA proportional to density, or optional concentration mode (e.g., Brix, °API, % solids).
7.3.3 Set the damping (response time). The default damping is 10 seconds (63% step response). For rapid process changes, reduce damping to 2–5 seconds. For noisy processes, increase to 30–60 seconds. Document your setting.
7.3.4 Configure alarm setpoints: High density alarm (HH) and low density alarm (LL) with appropriate deadbands.
7.4 DCS Integration
7.4.1 Verify the 4–20 mA loop: with the sensor reading air (empty pipe) or a known reference fluid, confirm the DCS analog input card reads the correct corresponding value. A reading of 4.00 mA corresponds to the configured lower range value (LRV); 20.00 mA corresponds to the upper range value (URV).
7.4.2 Verify Modbus RTU communication: using a Modbus test tool or the LONNMETER software, read registers at the configured address (default: 1). Confirm the Modbus map matches your configuration:
- Register 40001: Measured density (32-bit float)
- Register 40003: Process temperature (32-bit float)
- Register 40005: Status word
7.4.3 Configure the DCS: set the engineering unit, scaling (e.g., 0–2.000 g/cm³ mapped to 0–100%), alarm limits, and trend display. Place the signal on a process trend for at least one full cycle before relying on it for control.
7.5 Online Density Meter Calibration Verification
To verify calibration accuracy without removing the sensor:
- Two-point calibration check using process samples: Collect a sample of the process fluid at the inline density meter’s location (upstream sample tap, 1 m upstream of the sensor). Measure the sample density using a laboratory pycnometer or digital density meter (reference instrument). Compare with the inline meter’s reading. Acceptance criterion: within ±0.0005 g/cm³ at process conditions.
- Zero verification: With the process line isolated and the sensor emptied (gravity-drained or purged with nitrogen), verify the sensor reads within ±0.0002 g/cm³ of the calibrated zero reference (air density: 0.00120 g/cm³ at 20 °C).
- Temperature coefficient check: Compare the sensor’s reported temperature with an independent calibrated thermometer at the sensor thermowell. Acceptance criterion: within ±0.5 °C.
If any check fails outside the acceptance criterion, repeat the measurement after allowing a 15-minute stabilisation period. If the error persists, consult the LONNMETER service team before adjusting the calibration.
7.6 Commissioning Completion Checklist
| Item | Verified | Notes |
|---|---|---|
| Mechanical installation complete | ☐ | |
| LOTO removed, process restored | ☐ | |
| Grounding verified (< 1 Ω) | ☐ | |
| Power supply verified (18–32 V DC) | ☐ | |
| Indicator LEDs normal (green) | ☐ | |
| HART / Modbus communication active | ☐ | |
| Density range and units configured | ☐ | |
| 4–20 mA loop calibrated | ☐ | |
| DCS input configured and trending | ☐ | |
| Alarms tested (HH and LL) | ☐ | |
| Calibration verification completed | ☐ | |
| Documentation filed (as-built drawings) | ☐ |
Inline density meter installation: 8. Common Installation Mistakes
Even experienced instrumentation engineers make these errors. Learn from those who came before you.
Mistake 1: Installing too close to an upstream disturbance. The most common cause of poor accuracy is inadequate straight run upstream. An elbow one diameter upstream does not look dangerous on a P&ID, but it will inject swirl and asymmetry that the sensor cannot correct. Always check the isometric layout, not just the P&ID plan view.
Mistake 2: Substituting cable glands. An uncertified cable gland installed in an ATEX Zone 1 housing defeats the explosion protection. The flameproof joint is in the gland — it must be certified as part of the assembly. Use only LONNMETER-specified ATEX/IECEx glands.
Mistake 3: Grounding the cable shield at both ends. This creates a ground loop that injects common-mode noise into the 4-20 mA signal. Ground the shield at the receiving instrument only.
Mistake 4: Commissioning with the wrong damping setting. Excessive damping (60–120 seconds) masks real process changes, making the sensor appear stable when it is actually sluggish. Insufficient damping (< 2 seconds) exposes every tiny process fluctuation, triggering unnecessary alarms and control actions. Set damping based on the process time constant, not the engineer’s personal preference.
Mistake 5: Skipping the warm-up period. Electronics and the vibrating fork both need thermal equilibrium before accurate readings are possible. A 30-minute warm-up is not optional — it is part of the measurement cycle.
Mistake 6: Ignoring entrained gas. If your process has entrained gas (boiling, flashing, or turbulent flow conditions), the gas bubbles accumulate on and around the vibrating fork, adding apparent mass and generating a high density bias. Install the sensor in an upward vertical flow orientation, or use a deaeration chamber upstream of the sensor.
Mistake 7: No bypass loop on critical process lines. Removing an inline density meter for service on a live process line is high-risk and time-consuming. The few extra thousand dollars for a bypass loop and isolation valves pays for itself on the first maintenance event.
9. Frequently Asked Questions
Q1: Can LONNMETER inline density meters be installed horizontally, or must they be vertical?
A: Both orientations are supported. For liquid applications, vertical upward flow is preferred as it naturally purges entrained gas bubbles. Horizontal installation is acceptable if the sensor housing is positioned with the fork elements in the lower 45% of the pipe cross-section to minimise gas accumulation. Never install with the fork elements at the top of the pipe.
Q2: What is the minimum straight pipe run required upstream and downstream of the inline density meter?
A: The minimum requirement is 5× pipe diameter (5D) upstream and 3× pipe diameter (3D downstream) of unobstructed straight pipe. For viscous fluids (viscosity > 100 mPa·s), increase the upstream requirement to 10–12D. If these distances cannot be met, consult LONNMETER engineering for a flow straightener solution.
Q3: How do I handle wiring in an ATEX Zone 1 area?
A: All wiring in Zone 1 must comply with IEC 60079-14. Use armoured cable or steel conduit with ATEX-certified cable glands. The power supply in the safe area must be isolated by an intrinsic safety barrier rated for the sensor’s entity parameters (Ui, Ii, Pi). Never open the sensor junction box in a Zone 1 area without a gas clearance certificate. Route cable separately from VFD power cables.
Q4: How often should the inline density meter be recalibrated?
A: LONNMETER inline density meters are factory-calibrated with NIST-traceable reference standards and exhibit excellent long-term stability (typically < 0.001 g/cm³ drift per year under normal conditions). Annual verification against a process sample is recommended. Recalibration at the factory is typically required only if the sensor has been exposed to a process upset (e.g., overpressure, over-temperature, or corrosive attack) or after physical shock.
Q5: What should I do if the density reading is unstable?
A: Unstable readings have three common causes: (1) Entrained gas — check for bubbles in the fork chamber; orient vertically upward or install a deaeration loop. (2) Excessive flow velocity — verify flow velocity is < 3 m/s; install a bypass loop with flow restriction. (3) Electrical noise — check for ground loops, shield grounding at both ends, or VFD interference; reroute cable or add signal filtering. Use the LONNMETER DENSITY-SERIES diagnostic software to view the raw fork frequency and quality factor (Q-factor) — these parameters identify the root cause.
Q6: Can the inline density meter be installed on a bypass loop, and how should the bypass be sized?
A: Yes, bypass installation is the preferred configuration for most process applications. Size the bypass line at ½ to ⅔ of the main pipe diameter. Install a manual globe valve for flow control and full-bore ball valves for isolation. Set the bypass flow velocity to 0.5–1.5 m/s. The inline density meter on the bypass should face upward flow. Always include isolation valves so the sensor can be removed without shutting down the main process.
10. Conclusion
Inline density meter installation is not a bolt-it-in-and-forget-it task. The mechanical installation — flange selection, torque values, straight run geometry, and bypass loop design — sets the foundation for everything that follows. The electrical installation — cable gland certification, grounding, shield termination, and ATEX compliance — determines whether the sensor will operate reliably and safely in its intended environment. And the commissioning sequence — pre-energisation checks, warm-up, configuration, DCS integration, and calibration verification — is the final gate that separates a properly installed instrument from one that looks fine until the first process upset reveals hidden problems.
Every step in this guide exists because someone, somewhere, skipped it and paid the price in measurement error, unplanned downtime, or a safety incident. There is no shortcut to a well-installed inline density meter. But with the right preparation, the right tools, and this guide in hand, your LONNMETER DENSITY-SERIES online density meter will deliver the precision, stability, and reliability your process deserves.
Ready to take the next step? Contact the LONNMETER engineering team to discuss your specific application, request a detailed datasheet, or arrange a pre-installation technical review.
View LONNMETER DENSITY-SERIES Datasheet →
Contact LONNMETER Engineering →
Back to Inline Density Measurement Fundamentals →
Density Meter Selection Guide →
This article is part of the LONNMETER Technical Knowledge Base series. For related content, see: Inline Density Measurement Fundamentals (B-01) and Density Meter Selection Guide (B-03). © 2026 LONNMETER. All rights reserved.
An inline density meter installation that skips straight-run verification will produce erroneous density readings regardless of sensor quality. Always verify upstream and downstream straight pipe runs before commissioning.
For inline density meter installation in ATEX Zone 1 areas, all cable entries must use certified explosion-proof cable glands. Non-certified glands invalidate the ATEX certification of the entire installation.
The inline density meter installation commissioning checklist must include two-point calibration verification against process samples. Acceptance criterion: reading within ±0.001 g/cm³ of the reference value.
Repeat the inline density meter installation verification annually, or after any sensor maintenance, to confirm calibration drift remains within specification.
Bypass loop sizing for inline density meter installation: the bypass line diameter should be ½–⅔ of the main pipe diameter, with a design flow velocity of 0.5–1.5 m/s.
When the inline density meter installation is complete, the DCS trending screen should display stable density readings within ±0.0005 g/cm³ of the expected process value.
DN25 to DN100 flanges are standard for most inline density meter installation applications. Specify PN16 or PN40 flanges based on your process pressure rating.
An inline density meter installation that skips straight-run verification will produce erroneous density readings regardless of sensor quality. Always verify upstream and downstream straight pipe runs before commissioning.
For inline density meter installation in ATEX Zone 1 areas, all cable entries must use certified explosion-proof cable glands. Non-certified glands invalidate the ATEX certification of the entire installation.
The inline density meter installation commissioning checklist must include two-point calibration verification against process samples. Acceptance criterion: reading within ±0.001 g/cm³ of the reference value.
Repeat the inline density meter installation verification annually, or after any sensor maintenance, to confirm calibration drift remains within specification.
When the inline density meter installation is complete, the DCS trending screen should display stable density readings within ±0.0005 g/cm³ of the expected process value.